操作系统实验三--动态模块与设备驱动
[TOC]
在进行实验之前,查阅相关Makefile编写教程,链接如下: Makefile由浅入深–教程、干货
部分常用的预定义变量记录如下:
$* 不包含扩展名的目标文件名称
$+ 所有的依赖文件,以空格分开,并以出现的先后为序,可能包含重复的依赖文件
$< 第一个依赖文件的名称
$? 所有的依赖文件,以空格分开,这些依赖文件的修改日期比目标的创建日期晚
$@ 目标的完整名称 ****
$^ 所有的依赖文件,以空格分开,不包含重复的依赖文件
$% 如果目标是归档成员,则该变量表示目标的归档成员名称
注意:目标文件,表示最终生成的可执行文件;依赖文件是目标文件生成所需的文件。它们是目标文件的输入,通常是源代码、配置文件或脚本等。
如以下例子:
target: dep1.o dep2.o
    echo $@
    echo $^
    echo $+
    echo $<
    echo $?
运行 make 时:
$@ → target $^ → dep1.o dep2.o (去重)
$+ → dep1.o dep2.o (可以重复) $< → dep1.o (第一个依赖文件)
$? → 如果 dep1.o 和 dep2.o 中有更新的,列出更新的依赖文件。
V2.6动态模块示例加载
考虑到在阅读课件ppt以及实验指导书后,对动态模块仍有很多疑惑,如:
- 动态模块源代码存放位置是否有要求?
- 没有要求。动态模块源代码应与Makefile文件在同一个文件夹下
- 如何开始动态模块源代码的编写?
- 在任意位置编写动态模块源代码及Makefile文件
- 如何编译动态模块?
- 编写Makefile文件编译
- 如何查看当前主机linux可用动态模块编译版本?
- 使用uname -r查看当前版本
- 且当前版本的动态模块机制与 2.6 及其后的版本保持一致。
使用chatgpt询问后,部分疑惑解答如上,详细问答可查看以下链接: chatgpt询问动态模块疑惑
使用相关命令查看本地主机版本,结果如下:
[root@kp-test01 exper3]# uname -r
4.19.90-2110.8.0.0119.oe1.aarch64
由chat对话可知,该版本Linux内核使用动态模块规则与2.6版本保持一致。使用ppt提供的v2.6动态模块示例,源代码如下:
#include <linux/init.h>                                            /*必须要包含的头文件*/
#include <linux/kernel.h>
#include <linux/module.h>                                    /*必须要包含的头文件*/
static int mymodule_init(void)                                //模块初始化函数
{
  printk("hello,my module wored! \n");                    /*输出信息到内核日志*/
  return 0;
}
static void mymodule_exit(void) //模块清理函数
{
  printk("goodbye,unloading my module.\n");         /*输出信息到内核日志*/
}
module_init(mymodule_init);                                //注册初始化函数
module_exit(mymodule_exit);                              //注册清理函数
MODULE_LICENSE("GPL");                              //模块许可声明
所用Makefile文件为:
ifneq ($(KERNELRELEASE),)
obj-m := mymodules.o       #obj-m指编译成外部模块
else
KERNELDIR := /lib/modules/$(shell uname -r)/build  #定义一个变量,指向内核目录
PWD := $(shell pwd)
 modules:
    $(MAKE) -C $(KERNELDIR) M=$(PWD) modules  #编译内核模块
 endif
使用make命令编译结果如下:
[root@kp-test01 v26]# make
make -C /lib/modules/4.19.90-2110.8.0.0119.oe1.aarch64/build   M=/root/exper3/v26 modules  #编译内核模块
make[1]: Entering directory '/usr/src/kernels/4.19.90-2110.8.0.0119.oe1.aarch64'
  CC [M]  /root/exper3/v26/mymodules.o
  Building modules, stage 2.
  MODPOST 1 modules
  CC      /root/exper3/v26/mymodules.mod.o
  LD [M]  /root/exper3/v26/mymodules.ko
make[1]: Leaving directory '/usr/src/kernels/4.19.90-2110.8.0.0119.oe1.aarch64'
可见编译结果正常且符合预期。
加载及查看模块的结果如下:
[root@kp-test01 v26]# insmod mymodules.ko
[root@kp-test01 v26]# lsmod
Module                  Size  Used by
mymodules             262144  0
nf_log_ipv4           262144  1
nf_log_common         262144  1 nf_log_ipv4
xt_LOG                262144  1
ipt_REJECT            262144  1
nf_reject_ipv4        262144  1 ipt_REJECT
xt_set                262144  2
ip_set_hash_net       262144  1
可见模块正确加载
卸载模块:
[root@kp-test01 v26]# rmmod mymodules
[root@kp-test01 v26]# lsmod
Module                  Size  Used by
nf_log_ipv4           262144  1
nf_log_common         262144  1 nf_log_ipv4
xt_LOG                262144  1
ipt_REJECT            262144  1
nf_reject_ipv4        262144  1 ipt_REJECT
xt_set                262144  2
ip_set_hash_net       262144  1
ip_set                262144  2 xt_set,ip_set_hash_net
使用dmesg命令查看日志结果如下:
[ 6833.222562] mymodules: loading out-of-tree module taints kernel.
[ 6833.223120] mymodules: module verification failed: signature and/or required key missing - tainting kernel
[ 6833.224461] hello,my module wored!
[ 6957.489659] goodbye,unloading my module.
[ 7155.850430] hello,my module wored!
[ 7235.433122] goodbye,unloading my module.
成功输出源代码中的信息,示例被成功运行。
系统调用的篡改
用于系统调用篡改的动态模块源代码为:
#include <linux/init.h>
#include <linux/kernel.h>
#include <linux/module.h>
//original,syscall 78 function: gettimeofday
// new syscall 78 function: print "No 78 syscall has changed to hello" and return a+b
#define sys_No 78

unsigned long old_sys_call_func;
unsigned long p_sys_call_table=0xc0361860; // find in  /boot/System.map-'uname -r'

asmlinkage int hello(int a,int b) //new function
{
    printk("No 78  syscall has changed to hello");
    return a+b;
}
void modify_syscall(void)
{
    unsigned long *sys_call_addr;
    sys_call_addr=(unsigned long *)(p_sys_call_table+sys_No*4);
    old_sys_call_func=*(sys_call_addr);
    *(sys_call_addr)=(unsigned long)&hello;                //  point to new function
}
void restore_syscall(void)
{
    unsigned long *sys_call_addr;
    sys_call_addr=(unsigned long *)(p_sys_call_table+sys_No*4);
    *(sys_call_addr)=old_sys_call_func;                // point to original function
}
static int mymodule_init(void)
{
  modify_syscall();
  return 0;
}
static void mymodule_exit(void)
{
  restore_syscall();
}
module_init(mymodule_init);
module_exit(mymodule_exit);
MODULE_LICENSE("GPL");
使用的测试程序如下:
#include<stdio.h>
#include<sys/time.h>
#include<unistd.h>
int main()
{
    struct  timeval    tv;
    syscall(78,&tv,NULL); //before modify  syscall 78 :gettimeofday
    printf("tv_sec:%d\n",tv.tv_sec);
    printf("tv_usec:%d\n",tv.tv_usec);
    return 0;
}
modify_new_syscall.c
#include<stdio.h>
#include<sys/time.h>
#include<unistd.h>
int main()
{
    int ret=syscall(78,10,20); //after modify syscall 78
    printf("%d\n",ret);
    return 0;
}
这两个测试程序都为应用程序。 编译动态模块的Makefile文件如下:
ifneq ($(KERNELRELEASE),)
obj-m := modify_syscall.o       #obj-m指编译成外部模块
else
KERNELDIR := /lib/modules/$(shell uname -r)/build  #定义一个变量,指向内核目录
PWD := $(shell pwd)
 modules:
    $(MAKE) -C $(KERNELDIR) M=$(PWD) modules  #编译内核模块
 endif
编译后结果如下:
[root@kp-test01 modify_syscall]# make
make -C /lib/modules/4.19.90-2110.8.0.0119.oe1.aarch64/build   M=/root/exper3/modify_syscall modules  #编译内核模块
make[1]: Entering directory '/usr/src/kernels/4.19.90-2110.8.0.0119.oe1.aarch64'
  CC [M]  /root/exper3/modify_syscall/modify_syscall.o
  Building modules, stage 2.
  MODPOST 1 modules
  CC      /root/exper3/modify_syscall/modify_syscall.mod.o
  LD [M]  /root/exper3/modify_syscall/modify_syscall.ko
make[1]: Leaving directory '/usr/src/kernels/4.19.90-2110.8.0.0119.oe1.aarch64'
[root@kp-test01 modify_syscall]# ls
Makefile              modify_old_syscall.c  modify_syscall.ko     modify_syscall.mod.o  modules.order
modify_new_syscall.c  modify_syscall.c      modify_syscall.mod.c  modify_syscall.o      Module.symvers
在加载模块前后分别运行测试程序结果如下:
[root@kp-test01 modify_syscall]# gcc -o modify_old_syscall ./modify_old_syscall.c
[root@kp-test01 modify_syscall]# gcc -o modify_new_syscall ./modify_new_syscall.c
[root@kp-test01 modify_syscall]# ./modify_old_syscall
tv_sec:4196032
tv_usec:0
加载模块后运行结果如下:
[root@kp-test01 modify_syscall]# insmod modify_syscall.ko
Connection to 120.46.163.15 closed by remote host.
Connection to 120.46.163.15 closed.

~   88s
尝试多次,发现在加载模块时会自动断开连接。 动态模块加载断连 查阅上述资料后判断,可能有以下原因:
- 内核安全机制(如内核模块签名或防篡改)
- 现代 Linux 内核通常启用了以下机制来防止内核模块篡改:
- 内核模块签名验证: 默认要求模块经过签名。如果未正确签名,模块可能无法加载。
- 只读内存保护: 修改 sys_call_table 直接操作内核内存是受保护的。
- SELinux/AppArmor: 这些机制可能限制模块加载或内核内存修改。
- 现代 Linux 内核通常启用了以下机制来防止内核模块篡改:
- 地址错误或不兼容的内核版本 硬编码了 p_sys_call_table 的地址,但这个地址可能不适用于本地内核版本或编译配置。
考虑到之前加载未签名的v2.6动态模块示例未报错,猜测为地址错误。 查阅资料知: sys_call_table 地址通常被隐藏。动态查找是推荐方式,例如通过 kallsyms。 p_sys_call_table 地址可能导致访问非法内存,引发内核崩溃。 考虑使用动态获取 sys_call_table 的地址的方法:
#include <linux/kallsyms.h>
unsigned long *p_sys_call_table = NULL;

p_sys_call_table = (unsigned long *)kallsyms_lookup_name("sys_call_table");
if (!p_sys_call_table) {
    printk(KERN_ERR "Failed to find sys_call_table\n");
    return -1;
}
修改代码如下:
#include <linux/init.h>
#include <linux/kernel.h>
#include <linux/module.h>
//original,syscall 78 function: gettimeofday
// new syscall 78 function: print "No 78 syscall has changed to hello" and return a+b
#define sys_No 78

unsigned long old_sys_call_func;
// unsigned long p_sys_call_table=0xc0361860; // find in  /boot/System.map-'uname -r'

#include <linux/kallsyms.h>
unsigned long *p_sys_call_table = NULL;


asmlinkage int hello(int a,int b) //new function
{
    printk("No 78  syscall has changed to hello");
    return a+b;
}
void modify_syscall(void)
{
    unsigned long *sys_call_addr;
    sys_call_addr=(unsigned long *)(p_sys_call_table+sys_No);
    old_sys_call_func=*(sys_call_addr);
    *(sys_call_addr)=(unsigned long)&hello;                //  point to new function
}
void restore_syscall(void)
{
    unsigned long *sys_call_addr;
    sys_call_addr=(unsigned long *)(p_sys_call_table+sys_No);
    *(sys_call_addr)=old_sys_call_func;                // point to original function
}
static int mymodule_init(void)
{
  p_sys_call_table = (unsigned long *)kallsyms_lookup_name("sys_call_table");
  if (!p_sys_call_table) {
      printk(KERN_ERR "Failed to find sys_call_table\n");
      return -1;
  }

  modify_syscall();
  return 0;
}
static void mymodule_exit(void)
{
  restore_syscall();
}
module_init(mymodule_init);
module_exit(mymodule_exit);
MODULE_LICENSE("GPL");
编译运行后,仍然在加载模块时断开连接,查看/boot/System.map-‘uname -r’文件中sys_call_table的地址,结果如下:
ffff000008af0670 r str__raw_syscalls__trace_system_name
ffff000008af0680 r __func__.41796
ffff000008af0698 R sys_call_table
ffff000008af0fc8 r __func__.38273
替换后重新编译,在加载模块时仍然断开连接,内核崩溃。之后查阅以下资料:
- 动态模块和篡改系统调用
- linux内核hook技术之函数地址替换
- Linux系统调用hook
- Linux ARM64 hook系统调用
- syscall.2.html
- Linux Rootkit 系列二:基于修改 sys_call_table 的系统调用挂钩
- Control_register#CR0
- Linux中型实验:三、OpenEuler下添加新的系统调用
可知在修改系统调用时,需要先修改系统调用页表的可写性,关闭写保护。根据上述资料,考虑到实验环境中华为云openEuler操作系统为arm架构,最终在多次尝试下,使用update_mapping_prot函数修改整个.rodata segment为可写。该函数可从以下链接查看:
Linux ARM64 update_mapping_prot函数
修改后动态模块源代码如下:
#include <linux/init.h>
#include <linux/kernel.h>
#include <linux/module.h>
#include <linux/mm.h>
#include <linux/fs.h>
#include <linux/syscalls.h>
#include <asm/io.h>
#include <asm/unistd.h>  // 包含系统调用号等相关定义
#include <asm/pgtable.h>  // 为了访问页面表相关的函数和定义
#include <linux/uaccess.h>
#include <asm/paravirt.h>
#include <linux/kallsyms.h>

#define sys_No 78  // 需要修改的系统调用号

unsigned long old_sys_call_func;
unsigned long *p_sys_call_table = 0;  // 查找到的 sys_call_table 地址,依据 /boot/System.map 确定
// ffff000008af0698 R sys_call_table
// ffff000008af3a98 R a32_sys_call_table
void (*update_mapping_prot)(phys_addr_t phys, unsigned long virt, phys_addr_t size, pgprot_t prot);
// .rodata segment 区间
unsigned long start_rodata;
unsigned long init_begin;

#define section_size init_begin - start_rodata


//修改指定内核地址范围的内存属性为只读
static inline void protect_memory(void)
{
    update_mapping_prot(__pa_symbol(start_rodata), (unsigned long)start_rodata,
            section_size, PAGE_KERNEL_RO);
}

//修改指定内核地址范围的内存属性为可读可写等
static inline void unprotect_memory(void)
{
    update_mapping_prot(__pa_symbol(start_rodata), (unsigned long)start_rodata,
            section_size, PAGE_KERNEL);
}


// 新的系统调用函数
asmlinkage int hello(int a, int b) {
    printk("No 78 syscall has changed to hello\n");
    printk("a: %d, b: %d\n", a, b);
    return a + b;
}

// 修改系统调用
void modify_syscall(void) {
    update_mapping_prot = (void *)kallsyms_lookup_name("update_mapping_prot");

    start_rodata = (unsigned long)kallsyms_lookup_name("__start_rodata");
    init_begin = (unsigned long)kallsyms_lookup_name("__init_begin");

    p_sys_call_table = (unsigned long *)kallsyms_lookup_name("sys_call_table");
    printk("sys_call_addr: %p\n", p_sys_call_table);

    old_sys_call_func = (p_sys_call_table[sys_No]);  // 保存原始系统调用函数
    printk("old_sys_call_func: %lx\n", old_sys_call_func);

    unprotect_memory();
    p_sys_call_table[sys_No] = (unsigned long)&hello;
    protect_memory();

    printk("syscall 78 replaced successfully with hello function\n");
}

// 恢复原始的 sys_78 系统调用
void restore_syscall(void) {
    unprotect_memory();
    p_sys_call_table[sys_No] = old_sys_call_func;  // 恢复为原始的系统调用函数
    protect_memory();

    printk("syscall 78 restored to original\n");
}

// 模块初始化
static int mymodule_init(void) {
    printk("Module loading...\n");
    modify_syscall();
    return 0;
}

// 模块退出
static void mymodule_exit(void) {
    printk("Module unloading...\n");
    restore_syscall();
}

module_init(mymodule_init);
module_exit(mymodule_exit);

MODULE_LICENSE("GPL");
MODULE_AUTHOR("yuaay");
MODULE_DESCRIPTION("A simple syscall hook module for openEuler ARM");
注意:这里获得sys_call_table的地址时,使用的是kallsyms_lookup_name,这是因为System.map中显示的是内核编译时的静态地址,在运行时地址可能经过了动态调整,直接使用会访问错误的内存地址,导致内核崩溃。
此时重新编译代码加载模块,成功加载:
[root@kp-test01 modify_syscall]# make
make -C /lib/modules/4.19.90-2110.8.0.0119.oe1.aarch64/build   M=/root/exper3/modify_syscall modules  #编译内核模块
make[1]: Entering directory '/usr/src/kernels/4.19.90-2110.8.0.0119.oe1.aarch64'
  CC [M]  /root/exper3/modify_syscall/modify_syscall.o
  Building modules, stage 2.
  MODPOST 1 modules
  CC      /root/exper3/modify_syscall/modify_syscall.mod.o
  LD [M]  /root/exper3/modify_syscall/modify_syscall.ko
make[1]: Leaving directory '/usr/src/kernels/4.19.90-2110.8.0.0119.oe1.aarch64'
[root@kp-test01 modify_syscall]# insmod modify_syscall.ko
[root@kp-test01 modify_syscall]# lsmod
Module                  Size  Used by
modify_syscall        262144  0
aes_ce_blk            262144  0
crypto_simd           262144  1 aes_ce_blk
cryptd                262144  1 crypto_simd
日志如下:
[ 3604.213062] Module loading...
[ 3604.228647] sys_call_addr: 00000000bca137c4
[ 3604.228941] old_sys_call_func: ffff0000083735e0
[ 3604.229251] syscall 78 replaced successfully with hello function
[ 3604.231748] No 78 syscall has changed to hello
[ 3604.232071] a: 537460416, b: 14352384
[ 3604.232340] No 78 syscall has changed to hello
[ 3604.232629] a: 537460416, b: 14352384
[ 3604.232867] No 78 syscall has changed to hello
[ 3604.233152] a: 537460416, b: 14352384
[ 3604.233383] No 78 syscall has changed to hello
[ 3604.233667] a: 537460416, b: 14352384
[ 3604.233916] No 78 syscall has changed to hello
其中tail的内容为:
[root@kp-test01 modify_syscall]# dmesg | tail
[ 3604.259986] No 78 syscall has changed to hello
[ 3604.260293] a: 537460416, b: 14352384
[ 3604.260540] No 78 syscall has changed to hello
[ 3604.260834] a: 537460416, b: 14352384
[ 3604.261076] No 78 syscall has changed to hello
[ 3604.261369] a: 537460416, b: 14352384
[ 3604.261616] No 78 syscall has changed to hello
[ 3604.261905] a: 537460416, b: 14352384
[ 3604.262161] No 78 syscall has changed to hello
[ 3604.262453] a: 537460416, b: 14352384
此时运行modify_new_syscall程序有结果:
[root@kp-test01 modify_syscall]# ./modify_new_syscall
570293952
[root@kp-test01 modify_syscall]# ./modify_new_syscall
572391104
[root@kp-test01 modify_syscall]# dmesg | tail
[ 3604.261076] No 78 syscall has changed to hello
[ 3604.261369] a: 537460416, b: 14352384
[ 3604.261616] No 78 syscall has changed to hello
[ 3604.261905] a: 537460416, b: 14352384
[ 3604.262161] No 78 syscall has changed to hello
[ 3604.262453] a: 537460416, b: 14352384
[ 3812.391724] No 78 syscall has changed to hello
[ 3812.392056] a: 555941568, b: 14352384
[ 3815.407503] No 78 syscall has changed to hello
[ 3815.407839] a: 558038720, b: 14352384
成功返回了a+b的值,说明加载内核正确。但值得注意的是,这里返回的a+b并不是由传入参数相加得到的。查阅相关资料可知,arm架构下syscall传入参数通过寄存器x0,x1传递,修改代码直接由寄存器值得到参数,代码如下:
// 新的系统调用函数
asmlinkage int hello(/* int *a, int *b */void) {
    int a = (int)current_pt_regs()->regs[0]; // 从寄存器 x0 获取参数 a
    int b = (int)current_pt_regs()->regs[1]; // 从寄存器 x1 获取参数 b

    printk("No 78 syscall has changed to hello\n");
    printk("a: %d, b: %d\n", a, b);

    return a + b; // 返回 a 和 b 的和
}
结果如下:
[root@openeuler-ultra test]# ./new
30
[root@openeuler-ultra test]# ./new
30
[root@openeuler-ultra test]# dmesg | tail
[  728.237310] No 78 syscall has changed to hello
[  728.237601] a: -100, b: 940991640
[  728.237821] No 78 syscall has changed to hello
[  728.238108] a: -100, b: 940991640
[  728.238339] No 78 syscall has changed to hello
[  728.238630] a: -100, b: 940991640
[  729.208198] No 78 syscall has changed to hello
[  729.208538] a: 10, b: 20
[  730.538377] No 78 syscall has changed to hello
[  730.538709] a: -100, b: 738488808
正确。
配置模块签名
运行以下命令修改模块签名配置:
[root@kp-test01 modify_syscall]# make menuconfig
make: *** No rule to make target 'menuconfig'.  Stop.
查阅以下资料了解到该命令需要在完整的内核源码路径(例如 /usr/src/kernels/kernel-version)下执行。
更改目录后,安装ncurses 开发库,成功解决问题:
sudo yum install ncurses-devel bison flex elfutils-libelf-devel openssl-devel
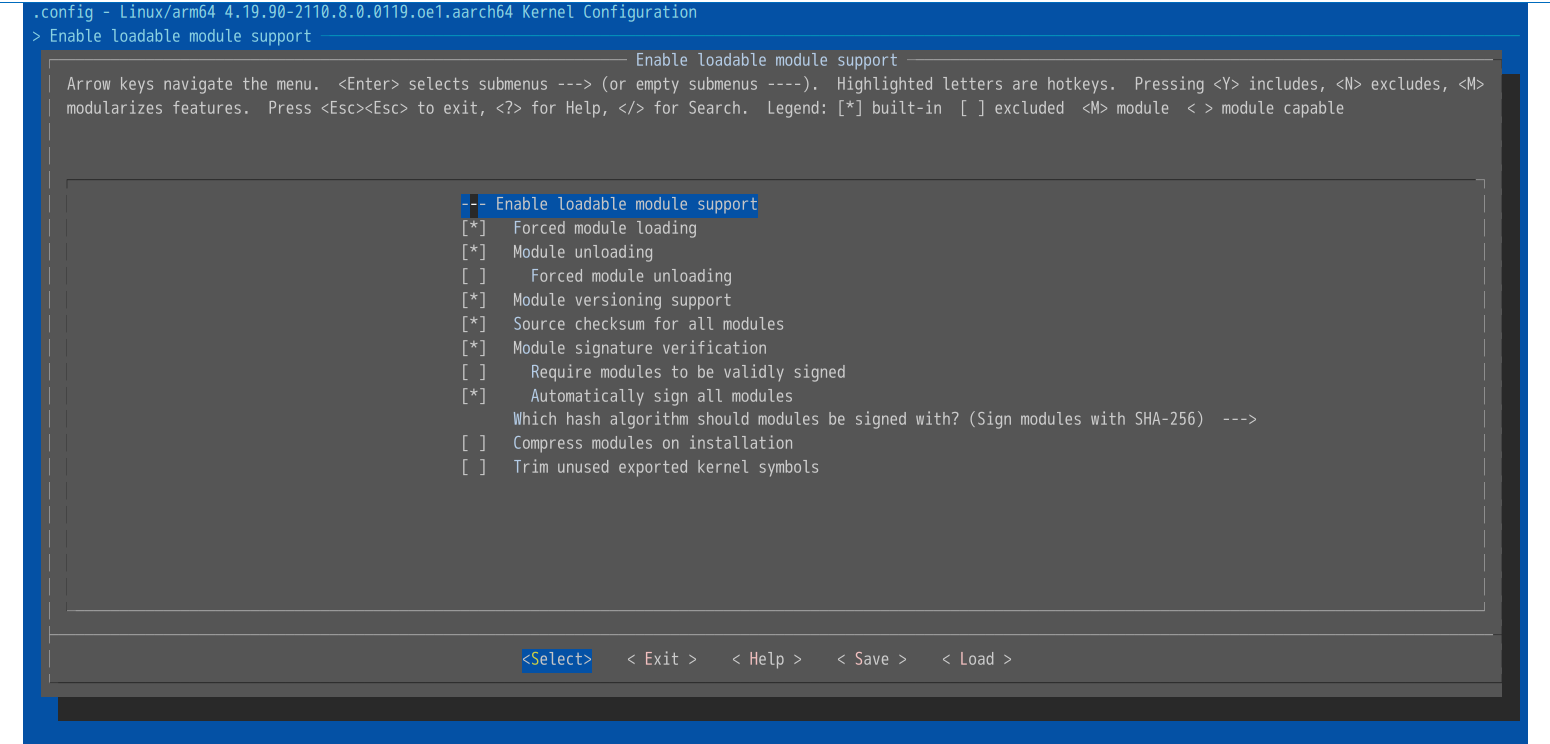
下图为命令的图形化界面:
之后生成签名密钥对:
[root@kp-test01 4.19.90-2110.8.0.0119.oe1.aarch64]# scripts/sign-file sha256 ./signing_key.priv .
Usage: scripts/sign-file [-dp] <hash algo> <key> <x509> <module> [<dest>]
       scripts/sign-file -s <raw sig> <hash algo> <x509> <module> [<dest>]
运行命令报错,查阅资料得知,需要先使用openssl生成私钥和自签名证书:
[root@kp-test01 4.19.90-2110.8.0.0119.oe1.aarch64]# openssl req -new -x509 -newkey rsa:2048 -keyout signing_key.priv -out signing_key.x509 -days 365 -nodes -subj "/CN=Custom Module Signing Key"
Generating a RSA private key
.....................................................................................................................................+++++
.................................................................................................+++++
writing new private key to 'signing_key.priv'
-----
[root@kp-test01 4.19.90-2110.8.0.0119.oe1.aarch64]# ls
arch   certs   Documentation  firmware  include  ipc      kernel  Makefile  Module.symvers  RPM-GPG-KEY-openEuler  scripts   signing_key.priv  sound       tools  virt
block  crypto  drivers        fs        init     Kconfig  lib     mm        net             samples                security  signing_key.x509  System.map  usr
之后重新执行命令:
[root@kp-test01 4.19.90-2110.8.0.0119.oe1.aarch64]# scripts/sign-file sha256 ./signing_key.priv ./signing_key.x509 ~/exper3/modify_syscall/modify_syscall.ko
[root@kp-test01 4.19.90-2110.8.0.0119.oe1.aarch64]# cd ~/exper3/modify_syscall/
[root@kp-test01 modify_syscall]# modinfo ./modify_syscall.ko | grep -i signer
signer:         Custom Module Signing Key
[root@kp-test01 modify_syscall]# insmod modify_syscall.ko
[root@kp-test01 modify_syscall]# lsmod
Module                  Size  Used by
modify_syscall        262144  0
aes_ce_blk            262144  0
crypto_simd           262144  1 aes_ce_blk
cryptd                262144  1 crypto_simd
字符设备
查阅以下资料:
- Linux字符设备中的两个重要结构体(file、inode)
- linux三大驱动类型:字符设备、块设备、网络设备
- 字符设备驱动模型
- 操作系统实验系列三: 字符设备驱动及进程间聊天程序
- dmesg七种用法
- Linux内核模块详解
可知要编写一个字符设备,要完成以下内容:
- 实现相关操作函数:open, read, write, close, ioctl
- 申请并分配设备号
- 初始化设备文件
- 绑定 file_operations 与操作函数的具体实现
考虑到本次实验中所用到的设备数量较少,选择不使用cdev,直接通过register_chrdev函数申请主设备号,并由该函数自动完成操作函数的绑定。对于设备文件,则通过定义的结构体来表示,在获得设备号后,通过kmalloc函数分配需要的内存空间。
代码编写如下:
#include <linux/kernel.h>
#include <linux/module.h>
#include <linux/fs.h>
#include <asm/uaccess.h>
#include <linux/init.h>
#include <linux/types.h>
#include <linux/errno.h>
#include <linux/mm.h>
#include <linux/sched.h>
#include <linux/cdev.h>
#include <asm/io.h>
#include <linux/slab.h>
#include <linux/device.h>


//相关操作函数声明
static int dev_open(struct inode *inode, struct file *filp);                                                      //打开字符设备
static ssize_t dev_read(struct file *filp, char __user *buf, size_t size, loff_t *pos);                      //读取字符设备(一个字节)
static ssize_t dev_write(struct file *filp, const char __user *buf, size_t size, loff_t *pos);        //写入字符设备(一个字节)
static loff_t dev_llseek(struct file *filp, loff_t offset, int whence);       //控制指针位置
static int dev_release(struct inode *inode, struct file *filp);                                                      //关闭字符设备
static int dev_ioctl(int fd, int cmd);

MODULE_LICENSE("GPL");
#define MAJOR_NUM 290
#define DEVICE_NAME "mydev"

//定义字符设备的缓冲区的大小
#ifndef DEV_SIZE
#define DEV_SIZE 1024
#endif

//定义设备存储块结构体
struct Device
{
    /* data */
    char *data;
    unsigned long size;
};

//驱动子设备结构体数组的指针
struct Device *device;

//主设备号
static int major=MAJOR_NUM;

struct file_operations dev_fops ={
    owner: THIS_MODULE,
    read: dev_read,
    write: dev_write,
    open: dev_open,
    llseek: dev_llseek,
    release: dev_release,
    ioctl: dev_ioctl
};

static int init_mymodule(void)
{
    int ret;
    ret = register_chrdev(MAJOR_NUM, DEVICE_NAME, &dev_fops);
    if (ret)
    {
        printk("dev register failure");
    }else
    {
        printk("dev register success");
    }

    device = kmalloc(sizeof(struct Device), GFP_KERNEL);
    if(!device){
        //创建失败,释放设备号并返回
        result = -ENOMEM;
        unregister_chrdev(major, DEVICE_NAME);
        return result;
    }

    device->size = DEV_SIZE;
    device->data = kmalloc(DEV_SIZE, GFP_KERNEL);
    memset(device->data, 0, DEV_SIZE);


    //驱动模块启动成功
    printk("device init success\n");
    return 0;
}

static void cleanup_mymodule(void)
{
    unregister_chrdev(MAJOR_NUM, "globalvar");
    //驱动模块卸载完毕
    printk(KERN_INFO "device exit success");
}

int dev_open(inode *inode, file *filp)
{
    filp->private_data=device;
    return 0;
}

ssize_t dev_read(file *filp, char __user *buf, size_t size, loff_t *pos)
{
    unsigned long position=*pos;
    unsigned int count=size;
    int result;
    struct Device *dev=filp->private_data;

    //如果要求位置非法则直接退出
    if(position>=DEV_SIZE)
        return 0;
    //调整读取数据长度
    if(count > DEV_SIZE - position)
    {
        count = DEV_SIZE - position;
    }

    //传送数据给用户
    if(copy_to_user(buf, (void*)(dev->data + position), count)) {
        result = -EFAULT;
    } else {
        *pos += count;
        result = count;
        printk(KERN_INFO "read %d bytes from %lu\n", count, position);
    }

    return result;
}

ssize_t dev_write(file *filp, const char __user *buf, size_t size, loff_t *pos)
{
    unsigned long position = *pos;
    unsigned int count = size;
    int result = 0;
    struct Device *dev = filp->private_data;

    //确保写入安全
    if (position >= DEV_SIZE)
        return 0;
    if (count > DEV_SIZE - position)
    {
        count = DEV_SIZE - position;
    }
    //写入数据
    if (copy_from_user(dev->data + position, buf, count)) {
        result = -EFAULT;
    } else {
        *pos += count;
        result = count;
        printk(KERN_INFO "write %d bytes from %lu\n", count, position);
    }

    return result;
}

loff_t dev_llseek(file *filp, loff_t offset, int whence)
{
    loff_t newpos;

    //选择操作类型
    switch (whence) {
        //指定新位置
        case 0:
            newpos = offset;
            break;
        //后移指针
        case 1:
            newpos = filp->f_pos + offset;
            break;
        //反向指定新位置
        case 2:
            newpos = DEV_SIZE - 1 + offset;
            break;
        default:
        return -EINVAL;
    }
    if ((newpos < 0) || (newpos > DEV_SIZE))
        return -EINVAL;

    filp->f_pos = newpos;
    return newpos;
}

int dev_release(inode *inode, file *filp)
{
    return 0;
}

int dev_ioctl(int fd, int cmd)
{
    return 0;
}

module_init(init_mymodule);
module_exit(cleanup_mymodule);
MODULE_LICENSE("GPL");
MODULE_AUTHOR("yuaay");
考虑到以下问题:
- struct file_operations 中的字段名需要显式初始化,通过形式: .read = dev_read。
- ioctl 未被标准 struct file_operations 支持。
- 在模块卸载时需要释放所有分配的内存。
修正代码如下:
#include <linux/kernel.h>
#include <linux/module.h>
#include <linux/fs.h>
#include <linux/uaccess.h>
#include <linux/init.h>
#include <linux/types.h>
#include <linux/errno.h>
#include <linux/mm.h>
#include <linux/sched.h>
#include <linux/cdev.h>
#include <linux/slab.h>
#include <linux/device.h>

// 相关操作函数声明
static int dev_open(struct inode *inode, struct file *filp);
static ssize_t dev_read(struct file *filp, char __user *buf, size_t size, loff_t *pos);
static ssize_t dev_write(struct file *filp, const char __user *buf, size_t size, loff_t *pos);
static loff_t dev_llseek(struct file *filp, loff_t offset, int whence);
static int dev_release(struct inode *inode, struct file *filp);

MODULE_LICENSE("GPL");
MODULE_AUTHOR("yuaay");
#define MAJOR_NUM 290
#define DEVICE_NAME "mydev"
#define DEV_SIZE 1024

// 定义设备存储块结构体
struct Device {
    char *data;
    unsigned long size;
};

// 驱动子设备结构体指针
struct Device *device;

// 文件操作结构体
struct file_operations dev_fops = {
    .owner = THIS_MODULE,
    .read = dev_read,
    .write = dev_write,
    .open = dev_open,
    .llseek = dev_llseek,
    .release = dev_release
};

// 模块初始化函数
static int __init init_mymodule(void) {
    int result;

    // 注册字符设备
    result = register_chrdev(MAJOR_NUM, DEVICE_NAME, &dev_fops);
    if (result < 0) {
        printk(KERN_ERR "Failed to register character device\n");
        return result;
    }

    // 分配设备结构体
    device = kmalloc(sizeof(struct Device), GFP_KERNEL);
    if (!device) {
        unregister_chrdev(MAJOR_NUM, DEVICE_NAME);
        return -ENOMEM;
    }

    device->size = DEV_SIZE;
    device->data = kmalloc(DEV_SIZE, GFP_KERNEL);
    if (!device->data) {
        kfree(device);
        unregister_chrdev(MAJOR_NUM, DEVICE_NAME);
        return -ENOMEM;
    }

    memset(device->data, 0, DEV_SIZE);
    printk(KERN_INFO "Device initialized successfully\n");
    return 0;
}

// 模块清理函数
static void __exit cleanup_mymodule(void) {
    if (device) {
        if (device->data)
            kfree(device->data);
        kfree(device);
    }
    unregister_chrdev(MAJOR_NUM, DEVICE_NAME);
    printk(KERN_INFO "Device unregistered successfully\n");
}

static int dev_open(struct inode *inode, struct file *filp) {
    filp->private_data = device;
    return 0;
}

static ssize_t dev_read(struct file *filp, char __user *buf, size_t size, loff_t *pos) {
    struct Device *dev = filp->private_data;
    size_t to_read;
    int ret;

    if (*pos >= DEV_SIZE)
        return 0;

    to_read = min(size, (size_t)(DEV_SIZE - *pos));
    if (copy_to_user(buf, dev->data + *pos, to_read))
        return -EFAULT;

    *pos += to_read;
    return to_read;
}

static ssize_t dev_write(struct file *filp, const char __user *buf, size_t size, loff_t *pos) {
    struct Device *dev = filp->private_data;
    size_t to_write;

    if (*pos >= DEV_SIZE)
        return 0;

    to_write = min(size, (size_t)(DEV_SIZE - *pos));
    if (copy_from_user(dev->data + *pos, buf, to_write))
        return -EFAULT;

    *pos += to_write;
    return to_write;
}

static loff_t dev_llseek(struct file *filp, loff_t offset, int whence) {
    loff_t newpos;

    switch (whence) {
    case SEEK_SET:
        newpos = offset;
        break;
    case SEEK_CUR:
        newpos = filp->f_pos + offset;
        break;
    case SEEK_END:
        newpos = DEV_SIZE + offset;
        break;
    default:
        return -EINVAL;
    }

    if (newpos < 0 || newpos > DEV_SIZE)
        return -EINVAL;

    filp->f_pos = newpos;
    return newpos;
}

static int dev_release(struct inode *inode, struct file *filp) {
    return 0;
}

module_init(init_mymodule);
module_exit(cleanup_mymodule);
使用的Makefile文件如下:
obj-m += mydev.o

all:
    make -C /lib/modules/$(shell uname -r)/build M=$(PWD) modules

clean:
    make -C /lib/modules/$(shell uname -r)/build M=$(PWD) clean
编译后执行以下命令:
# 加载模块
insmod mydev.ko
# 查看日志信息
dmesg | tail
# 创建设备节点
mknod /dev/mydev c 290 0
# /dev/mydev 是设备文件路径
# 290 是主设备号(由代码 #define MAJOR_NUM 290 定义)
# 0 是次设备号,因为代码里程序只能管理一个子设备,故只需要为0即可
chmod 666 /dev/mydev
# 为设备节点赋予权限
执行结果如下:
[root@openeuler-arm dev]# insmod mydev.ko
[root@openeuler-arm dev]# dmesg | tail -5
[11955.474934] mydev: loading out-of-tree module taints kernel.
[11955.475437] mydev: module verification failed: signature and/or required key missing - tainting kernel
[11955.476600] Device initialized successfully
[12335.485136] Device unregistered successfully
[12549.117348] Device initialized successfully
[root@openeuler-arm dev]# mknod /dev/mydev c 290 0
mknod: /dev/mydev: File exists
[root@openeuler-arm dev]# chmod 666 /dev/mydev
在这里因为已经执行过一次,故不需要再次创建设备节点
之后,通过终端执行以下操作验证设备操作:
[root@openeuler-arm dev]# echo "Hello, Device!" > /dev/mydev
[root@openeuler-arm dev]# cat /dev/mydev
Hello, Device!
[root@openeuler-arm dev]# echo "1234567890" > /dev/mydev
[root@openeuler-arm dev]# dd if=/dev/mydev bs=1 skip=5 count=5
678905+0 records in
5+0 records out
5 bytes copied, 3.9981e-05 s, 125 kB/s
可见数据的读取、写入、指针移动均正常。尝试在不同终端中读取、写入。 在第一个终端中写入,执行以下命令:
[root@openeuler-arm dev]# echo "Data from T1" > /dev/mydev
新建另一个终端读取,结果如下图:
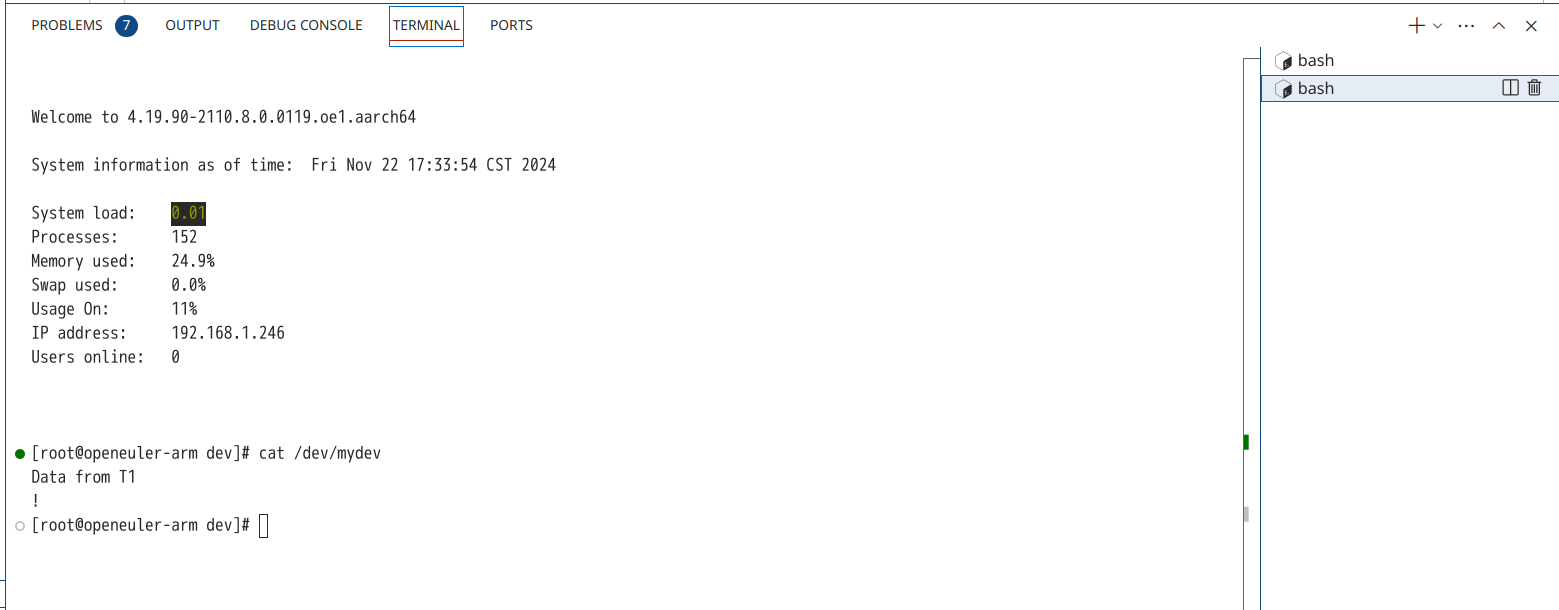 可见数据的读取正确。
将模块卸载,检查日志:
[root@openeuler-arm dev]# rmmod mydev
[root@openeuler-arm dev]# dmesg | tail
[    4.183435] systemd-journald[473]: Received client request to flush runtime journal.
[    6.611860] IPv6: ADDRCONF(NETDEV_UP): eth0: link is not ready
[    7.541671] cryptd: max_cpu_qlen set to 1000
[    9.894592] VFS: Open an exclusive opened block device for write vda2 [2137 resize2fs].
[11955.474934] mydev: loading out-of-tree module taints kernel.
[11955.475437] mydev: module verification failed: signature and/or required key missing - tainting kernel
[11955.476600] Device initialized successfully
[12335.485136] Device unregistered successfully
可见模块的卸载正常。
将模块的测试用代码来体现,代码如下:
#include <stdio.h>
#include <stdlib.h>
#include <string.h>
#include <fcntl.h>
#include <unistd.h>
#include <errno.h>

#define DEVICE_PATH "/dev/mydev"
#define BUFFER_SIZE 256

void test_open_close() {
    int fd = open(DEVICE_PATH, O_RDWR);
    if (fd < 0) {
        perror("Failed to open device");
        return;
    }
    printf("Device opened successfully\n");
    close(fd);
    printf("Device closed successfully\n");
}

void test_read() {
    int fd = open(DEVICE_PATH, O_RDWR);
    if (fd < 0) {
        perror("Failed to open device");
        return;
    }

    char buffer[BUFFER_SIZE];
    memset(buffer, 0, BUFFER_SIZE);

    ssize_t bytes_read = read(fd, buffer, BUFFER_SIZE);
    if (bytes_read < 0) {
        perror("Failed to read from device");
    } else {
        printf("Read %zd bytes: %s\n", bytes_read, buffer);
    }

    close(fd);
}

void test_write() {
    int fd = open(DEVICE_PATH, O_RDWR);
    if (fd < 0) {
        perror("Failed to open device");
        return;
    }

    const char *data = "Hello, kernel device!";
    ssize_t bytes_written = write(fd, data, strlen(data));
    if (bytes_written < 0) {
        perror("Failed to write to device");
    } else {
        printf("Wrote %zd bytes: %s\n", bytes_written, data);
    }

    close(fd);
}

void test_llseek() {
    int fd = open(DEVICE_PATH, O_RDWR);
    if (fd < 0) {
        perror("Failed to open device");
        return;
    }

    // Seek to position 10
    off_t new_pos = lseek(fd, 10, SEEK_SET);
    if (new_pos < 0) {
        perror("Failed to seek");
    } else {
        printf("Seeked to position: %lld\n", (long long)new_pos);
        char buffer[BUFFER_SIZE];
        memset(buffer, 0, BUFFER_SIZE);

        ssize_t bytes_read = read(fd, buffer, BUFFER_SIZE);
        if (bytes_read < 0) {
            perror("Failed to read from device");
        } else {
            printf("Read %zd bytes: %s\n", bytes_read, buffer);
        }
    }

    close(fd);
}

int main() {
    printf("Starting device tests...\n");

    printf("\nTesting open/close:\n");
    test_open_close();

    printf("\nTesting write:\n");
    test_write();

    printf("\nTesting read:\n");
    test_read();

    printf("\nTesting llseek:\n");
    test_llseek();

    printf("\nAll tests completed.\n");
    return 0;
}
运行结果如下:
[root@openeuler-arm dev]# gcc -o test_mydev ./test_mydev.c
[root@openeuler-arm dev]# ./test_mydev
Starting device tests...

Testing open/close:
Device opened successfully
Device closed successfully

Testing write:
Wrote 21 bytes: Hello, kernel device!

Testing read:
Read 256 bytes: Hello, kernel device!

Testing llseek:
Seeked to position: 10
Read 256 bytes: nel device!

All tests completed.
[root@openeuler-arm dev]#
可见运行的结果符合预期。
聊天程序的设计
设计思路
考虑到在聊天程序中,数据并不适合连续的存储,相反,每一次的发送、读取都是针对一条消息而言的。故修改设备模块的文件结构,将一个device定义为如下结构体:
struct Message
{
    pid_t sender_pid;    // 发送者进程号
    pid_t target_pid;    // 目标接收者进程号,0 表示群发
    char content[MAX_MSG_LEN]; // 消息内容
};

struct User
{
    pid_t pid;
    int head;
    int count;
};


struct MessageQueue
{
    struct Message messages[MAX_MSG_COUNT];
    // int curr;         //下一个该写入的位置
    // int head;             // 队列头
    int tail;             // 队列尾
    spinlock_t lock;      // 自旋锁保护队列
    // int count;            // 队列中消息数量
    int users_num;      // 目前用户数量
    struct User users[USERS_MAX_NUM];

};

// 定义设备存储块结构体,使用消息队列定义
struct Device
{
    struct MessageQueue queue;
};
其中,一个设备由消息队列,队列尾(同时指向下一个写入的位置),自旋锁,使用的进程数量,以及用于记录用户信息的数组组成。
此外,该聊天程序需要实现多对多的消息转发,每一个进程都需要读取其余进程发送的消息。也就是说,对于任何一个进程都需要记录他们对应的读取位置,从而实现在设备内一个消息可以被多个进程读取,而对于任意一个进程而言,任何一个消息同时又只读取一次。
这里考虑在设备结点文件中记录每个用户的信息,通过User结构体,记录当前进程的pid以及读取的位置、还没有读取的消息数量,之后在read函数中,遍历没有读取的消息,读取能够读取的信息。
此外,对于多个用户而言,读取、写入时还存在竞争与同步的问题。这个问题一方面可以在聊天程序客户端中使用自旋锁或者信号量解决,一方面也可以在设备模块中,在对应的写入和读取中使用自旋锁解决。这里选用第二种方式,同时由于自旋锁是被施加在写入、读取函数中,在客户端程序中就可以随意调用操作函数。
字符设备模块代码
完整的代码如下:
#include <linux/kernel.h>
#include <linux/module.h>
#include <linux/fs.h>
#include <linux/uaccess.h>
#include <linux/init.h>
#include <linux/types.h>
#include <linux/errno.h>
#include <linux/mm.h>
#include <linux/sched.h>
#include <linux/cdev.h>
#include <linux/slab.h>
#include <linux/device.h>
#include <linux/spinlock.h>

// 相关操作函数声明
static int dev_open(struct inode *inode, struct file *filp);
static ssize_t dev_read(struct file *filp, char __user *buf, size_t size, loff_t *pos);
static ssize_t dev_write(struct file *filp, const char __user *buf, size_t size, loff_t *pos);
static loff_t dev_llseek(struct file *filp, loff_t offset, int whence);
static int dev_release(struct inode *inode, struct file *filp);

MODULE_LICENSE("GPL");
MODULE_AUTHOR("yuaay");
#define MAJOR_NUM 290
#define DEVICE_NAME "mydev"
#define DEV_SIZE 1024

#define MAX_MSG_LEN 256
#define MAX_MSG_COUNT 64
#define USERS_MAX_NUM 6


struct Message
{
    pid_t sender_pid;    // 发送者进程号
    pid_t target_pid;    // 目标接收者进程号,0 表示群发
    char content[MAX_MSG_LEN]; // 消息内容
};

struct User
{
    pid_t pid;
    int head;
    int count;
};


struct MessageQueue
{
    struct Message messages[MAX_MSG_COUNT];
    // int curr;         //下一个该写入的位置
    // int head;             // 队列头
    int tail;             // 队列尾
    spinlock_t lock;      // 自旋锁保护队列
    // int count;            // 队列中消息数量
    int users_num;      // 目前用户数量
    struct User users[USERS_MAX_NUM];

};

// 定义设备存储块结构体,使用消息队列定义
struct Device
{
    struct MessageQueue queue;
};

// 驱动子设备结构体指针
struct Device *device;

// 文件操作结构体
struct file_operations dev_fops =
{
    .owner = THIS_MODULE,
    .read = dev_read,
    .write = dev_write,
    .open = dev_open,
    .llseek = dev_llseek,
    .release = dev_release
};

// 模块初始化函数
static int __init init_mymodule(void)
{
    int result;

    // 注册字符设备
    result = register_chrdev(MAJOR_NUM, DEVICE_NAME, &dev_fops);
    if (result < 0)
    {
        printk(KERN_ERR "Failed to register character device\n");
        return result;
    }

    // 分配设备结构体
    device = kmalloc(sizeof(struct Device), GFP_KERNEL);
    if (!device)
    {
        unregister_chrdev(MAJOR_NUM, DEVICE_NAME);
        return -ENOMEM;
    }

    // 初始化消息队列
    spin_lock_init(&device->queue.lock);
    // device->queue.head = 0;
    device->queue.tail = 0;
    // device->queue.count = 0;
    // device->queue.curr = 0;
    device->queue.users_num = 0;

    printk(KERN_INFO "Device initialized successfully\n");
    return 0;
}

// 模块清理函数
static void __exit cleanup_mymodule(void)
{
    if (device)
    {
        kfree(device);
    }
    unregister_chrdev(MAJOR_NUM, DEVICE_NAME);
    printk(KERN_INFO "Device unregistered successfully\n");
}

static int dev_open(struct inode *inode, struct file *filp)
{
    spin_lock(&device->queue.lock);
    if (device->queue.users_num >= USERS_MAX_NUM)
    {
        printk("open: users max");
        return -ENOMEM;
    }
    filp->private_data = device;
    device->queue.users[device->queue.users_num].pid = current->pid + 1;
    device->queue.users[device->queue.users_num].head = 0;
    device->queue.users[device->queue.users_num].count = device->queue.tail;
    device->queue.users_num++;
    printk("users_num: %d, new_user_pid: %d, new_user_count: %d", device->queue.users_num, current->pid, device->queue.tail);
    spin_unlock(&device->queue.lock);

    return 0;
}

static ssize_t dev_read(struct file *filp, char __user *buf, size_t size, loff_t *pos)
{
    struct Device *dev = filp->private_data;
    struct MessageQueue *queue = &dev->queue;
    struct Message msg;
    size_t copy_size;
    int user_num = 0;
    pid_t pid = current->pid;
    // printk("read: pid: %d", pid);
    int i;
    int found = 0;

    spin_lock(&queue->lock);
    for (i = 0; i < queue->users_num; i++)
    {
        if (queue->users[i].pid == pid)
        {
            // printk("read: find the user: %d", pid);
            user_num = i;
            found = 1;
            break;
        }
    }
    if (!found)
    {
        spin_unlock(&queue->lock);
        // printk("read: no registered user");
        return 0;
    }
    queue->users[user_num].count = (queue->tail - queue->users[user_num].head + MAX_MSG_COUNT) % MAX_MSG_COUNT;
    // printk("read: user_num: %d", user_num);
    if (queue->users[user_num].count == 0)
    {
        // printk("read: nomessage!");
        spin_unlock(&queue->lock);
        return 0;  // 队列为空
    }

    // 查找属于当前进程的消息
    found = 0;

    int index = (queue->users[user_num].head) % MAX_MSG_COUNT;
    if (queue->messages[index].target_pid == 0 ||  // 群发消息
        queue->messages[index].target_pid == pid )
    {
        msg = queue->messages[index];
        queue->users[user_num].head = (queue->users[user_num].head + 1) % MAX_MSG_COUNT;
        // queue->users[user_num].count--;
        found = 1;
        printk("read: find the message! count: %d", queue->users[user_num].head);
    }
    else
    {
        queue->users[user_num].head = (queue->users[user_num].head + 1) % MAX_MSG_COUNT;
        // queue->users[user_num].count--;
    }
    spin_unlock(&queue->lock);

    if (!found) {
        return 0;  // 没有可读取的消息
        printk("read: current is not available message! count: %d", queue->users[user_num].count);
    }

    // 将消息内容复制到用户空间
    copy_size = min(size, sizeof(msg.content));
    if (copy_to_user(buf, &msg.content, copy_size))
        return -EFAULT;

    return copy_size;
}

static ssize_t dev_write(struct file *filp, const char __user *buf, size_t size, loff_t *pos)
{
    struct Device *dev = filp->private_data;
    struct MessageQueue *queue = &dev->queue;
    struct Message msg;
    size_t copy_size;
    char temp[MAX_MSG_LEN];

    if (size > MAX_MSG_LEN)
        return -EINVAL;

    copy_size = min(size, sizeof(temp) - 1);
    if (copy_from_user(temp, buf, copy_size))
        return -EFAULT;

    temp[copy_size] = '\0';  // 确保消息是以 NULL 结尾的字符串

    // 初始化消息
    msg.sender_pid = current->pid;
    msg.target_pid = 0;  // 默认是群发

    // 检查是否是私聊消息
    if (temp[0] == '@')
    {
        char *endptr;
        msg.target_pid = simple_strtol(temp + 1, &endptr, 10);  // 提取目标 PID
        if (*endptr != ' ' && *endptr != '\0')
        {
            return -EINVAL;  // 如果格式错误,返回无效参数
        }
        // 消息内容跳过 "@pid "
        memmove(temp, endptr + 1, strlen(endptr + 1) + 1);
        printk("write: This is a '@' message!");
    }

    strncpy(msg.content, temp, MAX_MSG_LEN - 1);
    msg.content[MAX_MSG_LEN - 1] = '\0';

    // 加入消息队列
    spin_lock(&queue->lock);
    // 设计为循环队列,消息满了后重头开始
    // if (queue->count == MAX_MSG_COUNT)
    // {
    //     spin_unlock(&queue->lock);
    //     return -ENOMEM;  // 队列已满
    // }

    queue->messages[queue->tail] = msg;
    queue->tail = (queue->tail + 1) % MAX_MSG_COUNT;
    printk("write: write complete!");
    printk("write: content: %s", msg.content);
    spin_unlock(&queue->lock);

    return size;
}

static loff_t dev_llseek(struct file *filp, loff_t offset, int whence)
{
    loff_t newpos;

    switch (whence) {
    case SEEK_SET:
        newpos = offset;
        break;
    case SEEK_CUR:
        newpos = filp->f_pos + offset;
        break;
    case SEEK_END:
        newpos = DEV_SIZE + offset;
        break;
    default:
        return -EINVAL;
    }

    if (newpos < 0 || newpos > DEV_SIZE)
        return -EINVAL;

    filp->f_pos = newpos;
    return newpos;
}

static int dev_release(struct inode *inode, struct file *filp)
{
    return 0;
}

module_init(init_mymodule);
module_exit(cleanup_mymodule);
聊天程序设计
由于在设备模块代码中已经实现了自旋锁,故在聊天程序只需要通过两个线程,一个负责读取并处理消息,一个负责用户写入消息的处理即可。
代码如下:
#include <stdio.h>
#include <stdlib.h>
#include <string.h>
#include <fcntl.h>
#include <unistd.h>
#include <pthread.h>
#include <errno.h>

#define DEVICE_PATH "/dev/mydev"
#define MAX_MSG_LEN 256

// int last = 0; // last = 0表示上一行消息为读取,1表示上一行消息为写入
// struct Message
// {
//     pid_t sender_pid;    // 发送者进程号
//     pid_t target_pid;    // 目标接收者进程号,0 表示群发
//     char content[MAX_MSG_LEN]; // 消息内容
// };

void *receive_messages(void *arg) {
    int fd = *(int *)arg;
    char buffer[MAX_MSG_LEN];
    // struct Message *buffer;
    ssize_t len;

    while (1) {
        len = read(fd, buffer, sizeof(buffer));
        if (len > 0) {
            buffer[len - 8] = '\0';  // 确保消息以 NULL 结尾
            // if (last)
            // {
            //     printf("\n[Received]: %s\n", buffer);
            // }
            // else
            // {
            //     printf("[Received]: %s\n", buffer);
            // }
            // last = 0;
            printf("[Received]: %s\n", buffer);
        } else if (len < 0) {
            perror("Error reading from device");
            break;
        }
    }
    return NULL;
}

int main() {
    int fd;
    char input[MAX_MSG_LEN];
    pthread_t receiver_thread;

    // 打开字符设备
    fd = open(DEVICE_PATH, O_RDWR);
    if (fd < 0) {
        perror("Failed to open device");
        return EXIT_FAILURE;
    }

    // 启动接收线程
    if (pthread_create(&receiver_thread, NULL, receive_messages, &fd) != 0) {
        perror("Failed to create receiver thread");
        close(fd);
        return EXIT_FAILURE;
    }

    printf("Enter messages to send. Type 'exit' to quit. Current user: %d\n", getpid() + 1);
    while (1) {
        // printf("Enter message: ");
        // last = 1;
        if (fgets(input, sizeof(input), stdin) == NULL) {
            perror("Error reading input");
            break;
        }

        // 去掉换行符
        input[strcspn(input, "\n")] = '\0';

        if (strcmp(input, "exit") == 0) {
            break;
        }

        // 写入消息
        if (write(fd, input, strlen(input)) < 0) {
            perror("Error writing to device");
            break;
        }
    }

    // 关闭设备并退出
    close(fd);
    pthread_cancel(receiver_thread);
    pthread_join(receiver_thread, NULL);

    printf("Client exited.\n");
    return EXIT_SUCCESS;
}
运行结果
以下为三个进程的运行结果图:
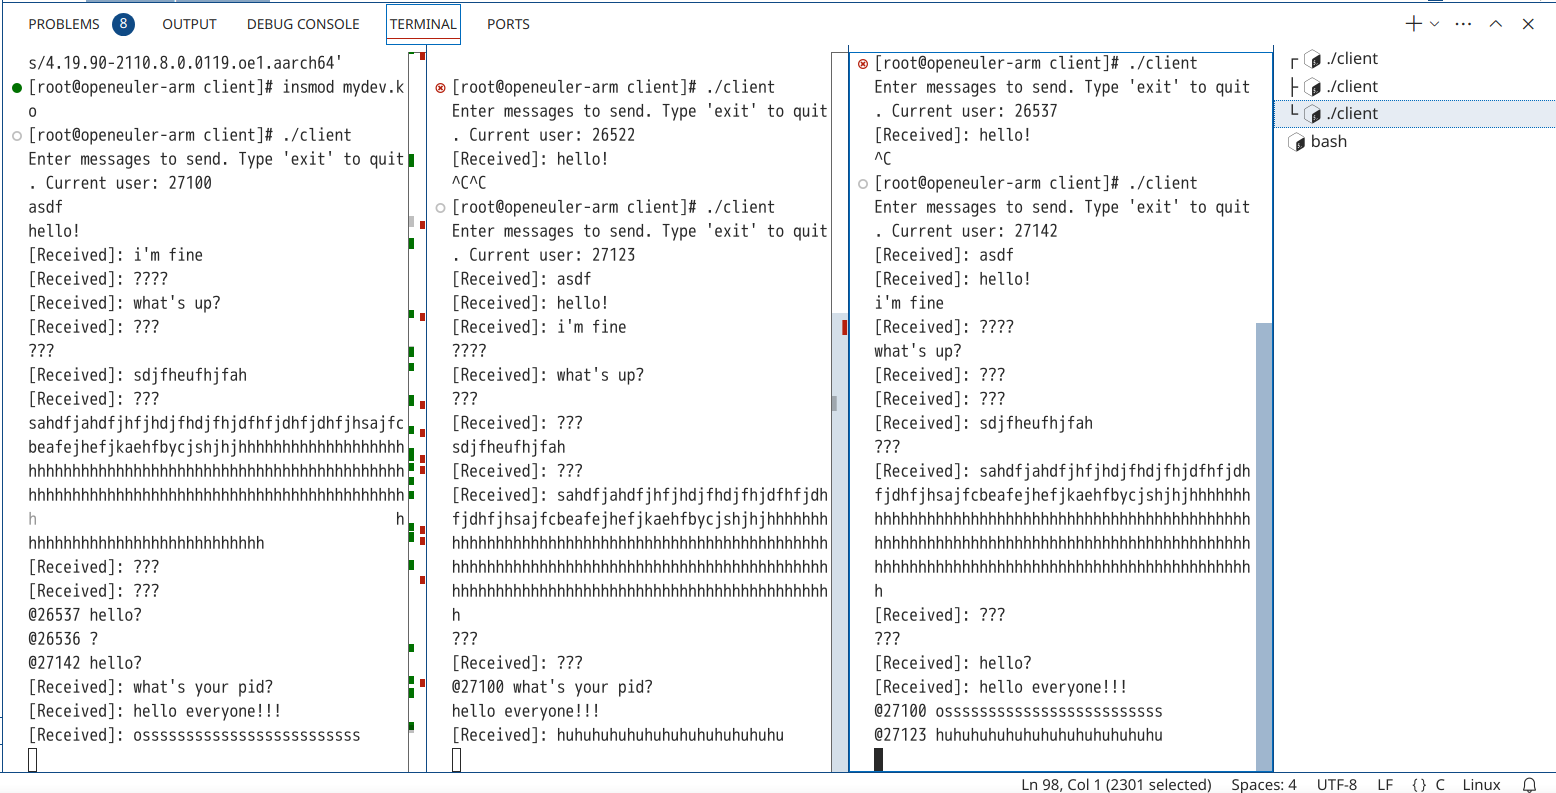
可见成功实现了多对多的对话,并且经过测试,通过@标识的私聊信息也正常发送。